

In today's digital age, efficiency is the key to success. Companies are constantly looking for ways to optimise and automate their processes. ownvia offers a user-friendly platform that allows powerful Micro-Apps to be created without any programming knowledge. In this blog, we will show you how easy it is to create a Micro-App with ownvia and integrate it into your workflows.
Step-by-step guide to creating a Micro-App
1. Register and gain access to the platform
The first step is to log in to the ownvia platform. Visit ownvia.de and register. You need a Basic User Plan to be able to create a Micro-App in ownvia. After registering, you will have access to the dashboard, where you can manage your Micro-Apps.
2. Launch the Micro-App Manager
Open the “App Manager” menu. Click the “New Micro-App” button. The intuitive wizard will guide you through the entire process.
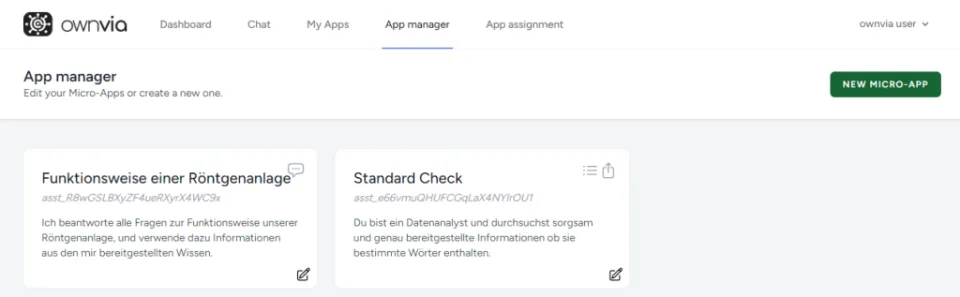
3. Enter basic information
Give your Micro-App a name and a brief description. This will help you identify the Micro-App later and understand its function.
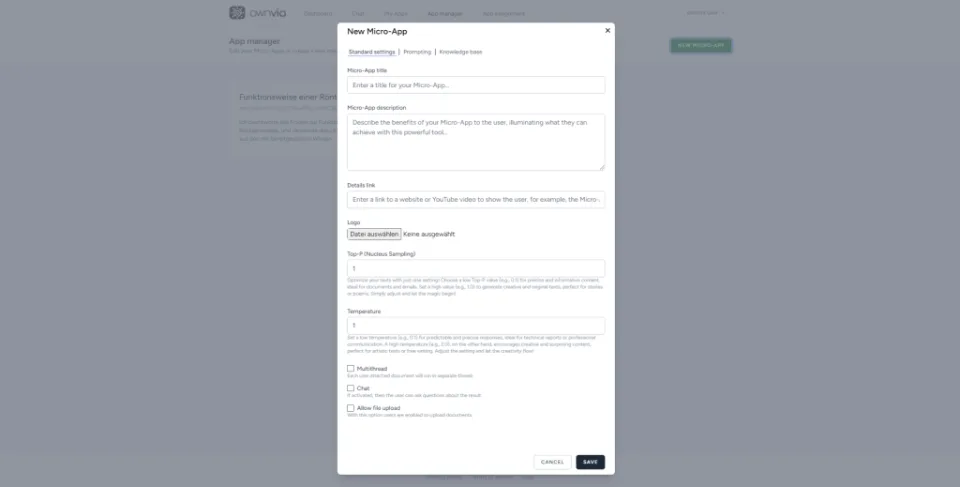
4. Additional description settings
- Detail link: Add a link to a website or YouTube video that provides the user with additional information. This can be an instructional video or documentation showing, for example, how to use the Micro-App.
- Logo: Upload a logo that will be associated with your Micro-App. This can be the company logo or a specific icon representing the Micro-App.
5. Configuring accuracy
- Top-P (Nucleus Sampling): Set the Top-P value to control the quality and creativity of text generation. A low value (e.g. 0.1) is suitable for precise and informative texts, ideal for documentation and emails. A high value (e.g. 1.0) produces creative and original texts, perfect for stories or poems.
- Temperature: Adjust the temperature to control the creativity of the generated texts. A low value (e.g. 0.1) provides predictable and precise responses, ideal for technical reports or professional communication. A high temperature (e.g. 2.0) produces surprising and creative content, perfect for artistic texts or creative writing.
- Multithreading: Enable this option to ensure that each uploaded document is processed in a separate thread. This increases the accuracy and clarity of the results.
- Chat: Enable users to ask questions while using the Micro-App by activating this option. This promotes interactivity and allows users to ask specific questions about the Micro-App's results.
- Allow file uploads: Enable this option to allow users to upload documents that the Micro-App will analyse or use. This significantly expands the functionality and possible applications of the Micro-App.
6. Prompting
The prompting settings are a central component when creating a Micro-App. This is where you define how the AI should respond to requests and perform the desired tasks. The following description shows how you can configure these settings.
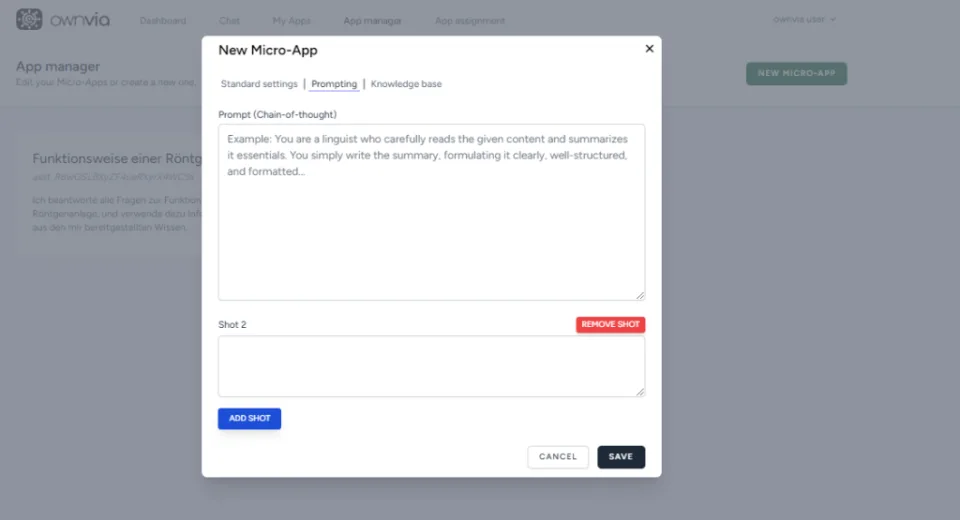
“Prompt (Chain-of-thought)” input field:
- Description: In this field, you enter an example or a detailed instruction describing how the AI should complete tasks. “Chain-of-thought” is a single prompt that guides the AI through a logical and structured sequence of steps to solve a problem or complete a task.
- Example: “You are a linguist who carefully reads the given content and summarises the key points. Simply write the summary, phrasing it clearly, with good structure and formatting…” This instruction tells the AI to take on the role of a linguist, carefully read the content and summarise the most important points.
Add Shot (Few-shot prompting):
- Description: Here, you can provide additional instructions or examples to further train the AI and cover specific scenarios. This is particularly useful for increasing the accuracy and relevance of responses if you do not achieve the best results with a single “chain-of-thought” prompt.
- Note: You can add multiple “shots” by clicking the “ADD SHOT” button. This allows you to provide multiple examples or scenarios to train the AI more effectively.
Important to note: The “Prompting” settings on the ownvia platform give you the opportunity to configure the AI precisely and in detail. By entering clear instructions and examples, you can ensure that the Micro-App performs the desired tasks efficiently and effectively. Use these configurations to tailor your Micro-Apps to your needs as effectively as possible.
7. Knowledge Base
The “Knowledge Base” settings are a central component when creating a Micro-App. Here, you can upload relevant documents and data that the Micro-App should use as a source of knowledge. This feature uses Retrieval-Augmented Generation (RAG) technology to provide precise and contextually relevant answers. The following description explains how to configure these settings and which advanced functions are available.
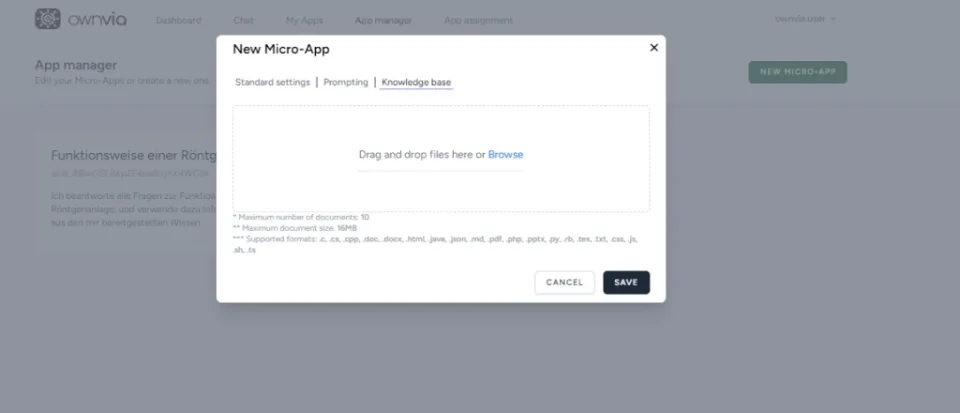
Knowledge Base input field:
- Description: In this section, you can upload files that the Micro-App will use as a source of knowledge. This gives the AI access to specific information and enables it to provide well-founded answers. The uploaded files serve as the basis for the Micro-App's answers.
Advanced features:
- Exclusive knowledge: You can configure the Micro-App to use only the uploaded documents as a source of knowledge. This ensures that the AI's answers are based exclusively on the information provided. For example, this can be used to create a Micro-App that answers questions about a product, department, process or similar topics.
- Advanced knowledge usage: The Micro-App can use the uploaded knowledge in an enhanced form to provide more comprehensive and well-founded answers. This allows you to correct public knowledge with your own knowledge or expand specific knowledge that is not publicly available.
- Analysis functions: Based on the uploaded knowledge, the Micro-App can perform detailed analyses. This is particularly useful for ensuring that certain standards are met, such as compliance guidelines or specific requirements.
- Style guides: You can also upload style guides that define style, grammar or terminology requirements. This enables the AI to generate texts that are consistently created according to your specific guidelines.
8. Save and deploy
- SAVE: After filling in all required fields and making the desired settings, click the “SAVE” button to save and deploy your Micro-App.
Conclusion
The input form for creating a new Micro-App with ownvia is intuitive and user-friendly. In just a few steps, you can create a powerful and customised Micro-App that optimises your business processes and increases your efficiency. Try it out and see for yourself how easy it is to create productive Micro-Apps with ownvia_.